13 Creative Minnie Mouse Birthday Party DIY Ideas You Can Easily Make
Discover 13 budget-friendly Minnie Mouse party DIYs using craft store basics—each takes under an hour to create stunning decorations.
Planning a Minnie Mouse birthday party doesn’t mean you’ll need to break the bank on expensive decorations. You can create a magical celebration with simple materials you’ll find at your local craft store—think tulle, cardstock, and mason jars. I’ve tested these thirteen DIY projects myself, and they’re genuinely beginner-friendly. The best part? Each one takes less than an hour to complete, and your guests won’t believe you didn’t hire a professional party planner. Let’s start with the centerpieces.
DIY Minnie Mouse Bow Centerpieces Using Tulle and Cardstock
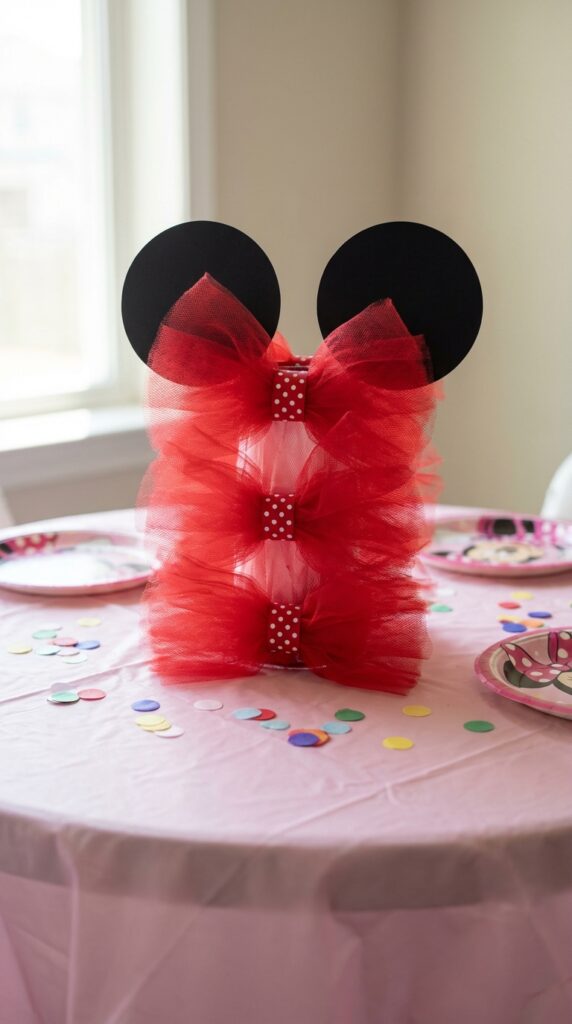
When it comes to creating show-stopping Minnie Mouse decorations, bow centerpieces made from tulle and cardstock deliver maximum impact without breaking the bank. You’ll want to experiment with different bow styles—I’ve found that layered bows work best for tables, while single loops shine on buffet displays.
Start by cutting cardstock circles as your base, then wrap tulle around the center to create that signature ribbon texture. Hot glue holds everything together perfectly. Pro tip: add polka dot washi tape for extra flair.
For an especially refined look, consider incorporating soft pink shades that bring elegant and feminine touches to your Minnie Mouse theme.
Each centerpiece costs under three dollars and takes just ten minutes to assemble.
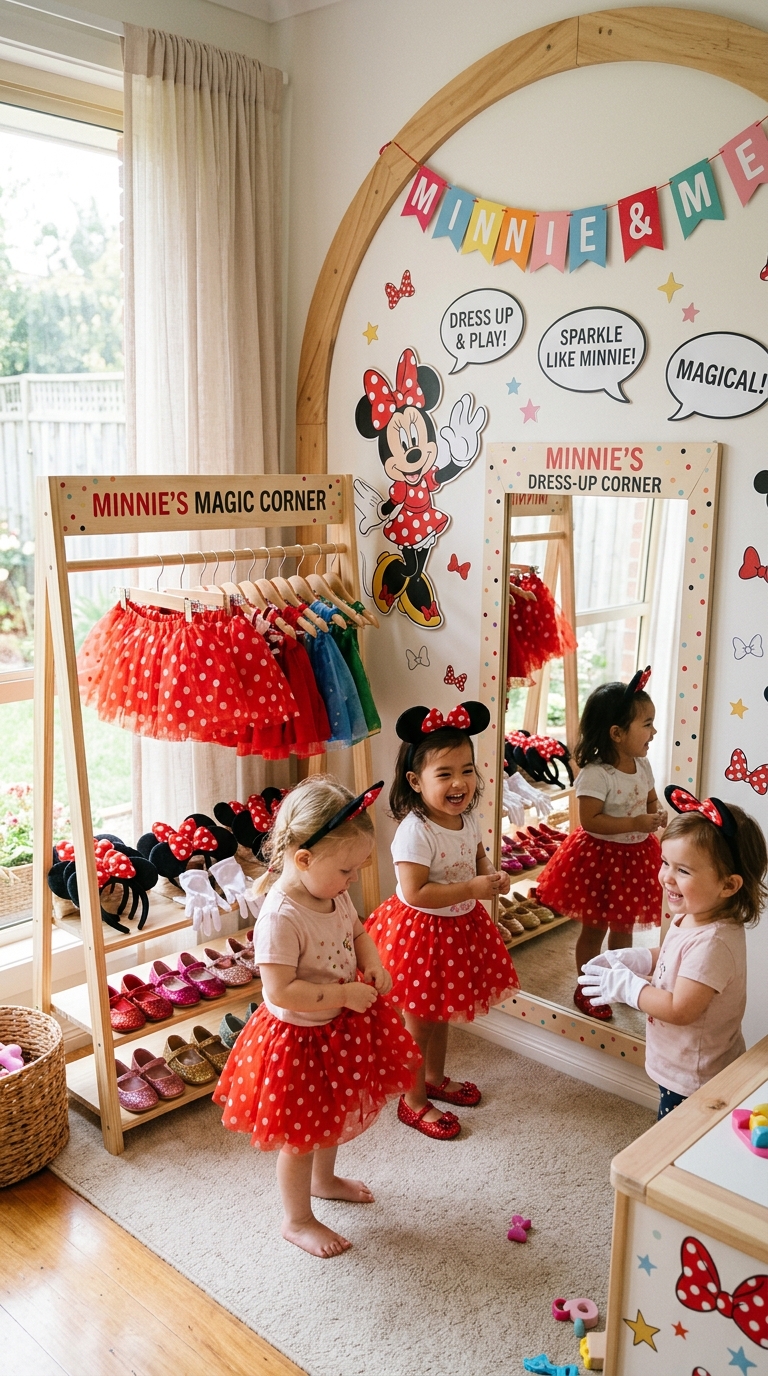
Create Custom Minnie Mouse Ear Headbands for Party Guests
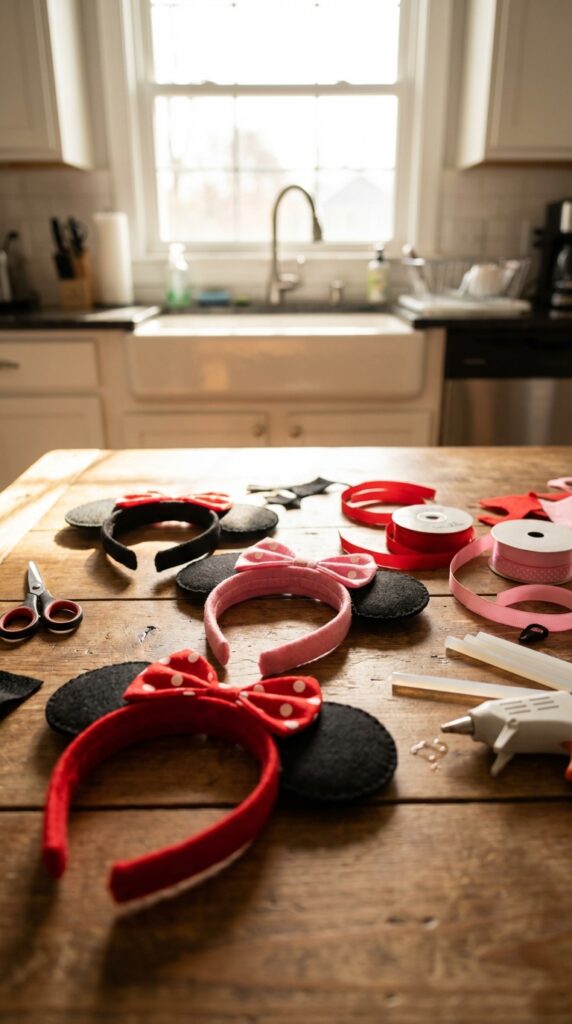
Those iconic Mickey ears metamorphose ordinary party guests into authentic Disney characters, and making your own headbands gives you complete creative control over colors, patterns, and embellishments.
Start with basic plastic headbands from the dollar store, then cut ear shapes from black felt or foam. I’ve found that cardboard templates guarantee consistency across multiple customized ear headbands. Hot glue works best for attaching ears securely.
Here’s where it gets fun: let kids personalize their unique ear headband designs with fabric markers, glitter glue, or stick-on gems. You’ll create party favors they’ll actually wear beyond the celebration.
Consider pairing these handmade ear headbands with matching Minnie Mouse tutus to complete the perfect birthday outfit for your little celebration star.
Hand-Painted Polka Dot Mason Jar Treat Holders
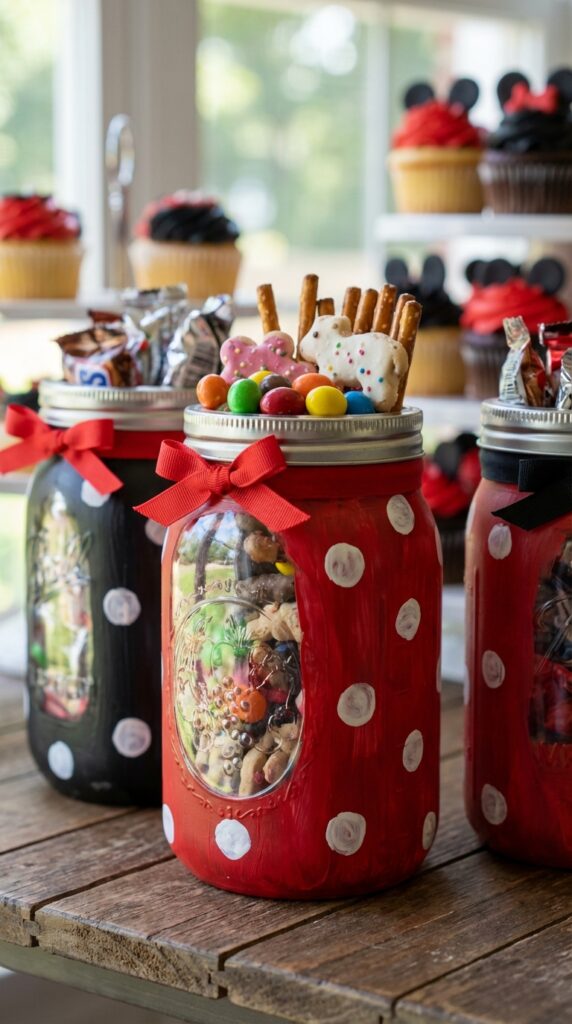
Mason jars convert into adorable Minnie Mouse treat containers with just a few coats of paint and some strategically placed polka dots. You’ll want to use acrylic paint in Minnie’s signature red, white, and black colors. I recommend applying two coats for solid coverage, letting each dry completely.
Once painted, add personalized labels with each guest’s name—it makes them feel extra special. Top them off with decorative lids wrapped in coordinating ribbon or fabric. Fill these charming containers with candies, cookies, or small toys. They double as party favors guests can take home and reuse.
These DIY treat holders work especially well for toddler birthday celebrations since little hands can easily grip the mason jars during the party festivities.
Make Your Own Minnie Mouse Photo Booth Backdrop
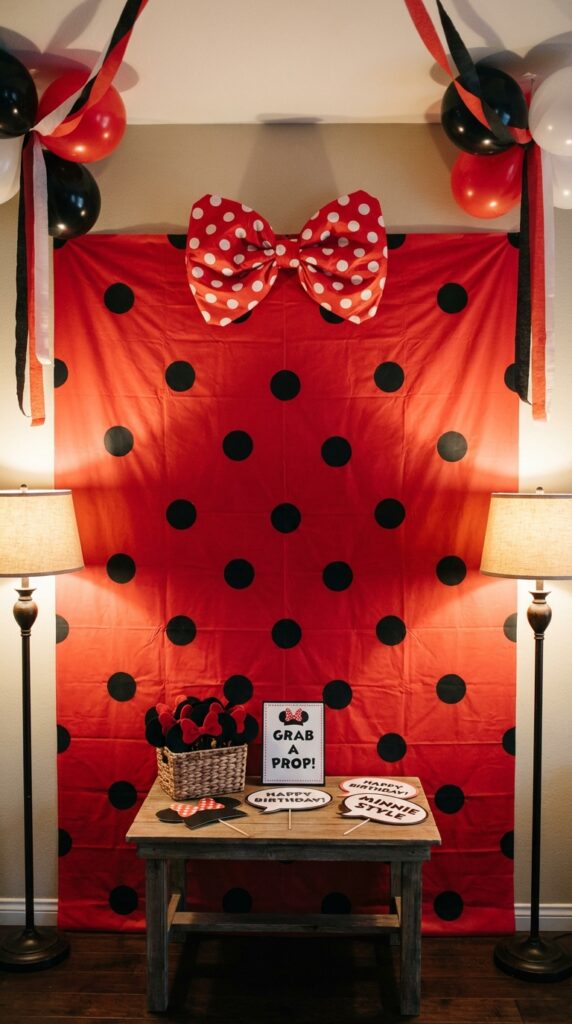
Creating a photo booth backdrop alters any corner of your party space into an Instagram-worthy moment. You’ll need a large foam board, red fabric, and oversized black cardstock circles for polka dots. I’ve found that hot-gluing the fabric creates a smooth base, while scattered dots add Minnie’s signature charm.
Don’t overlook photography lighting techniques—position two floor lamps at 45-degree angles to eliminate shadows. Trust me, proper lighting makes every snapshot pop.
For backdrop design ideas, consider adding a giant bow centerpiece or dangling ribbon streamers. Your guests won’t stop posing (and you’ll love the keepsake photos).
To complete your magical setup, explore various birthday party themes that incorporate classic Minnie Mouse elements like pink and red color schemes throughout your entire celebration space.
DIY Minnie Mouse Balloon Garland in Red, Black, and Pink
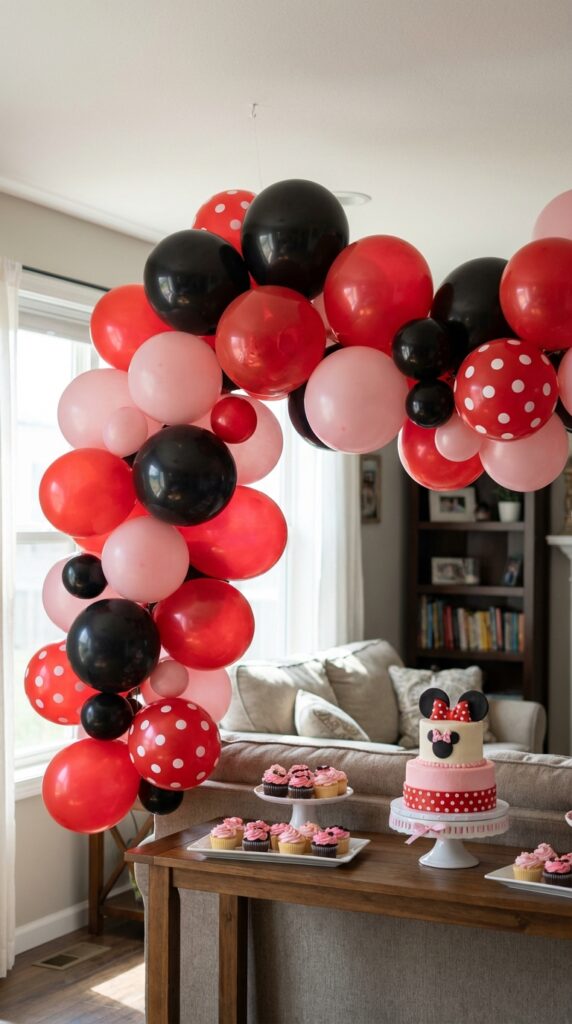
When you’re ready to make a serious visual impact, balloon garlands deliver that “wow factor” better than almost any other decoration. You’ll need red, black, and pink balloons in various sizes, plus balloon tape or fishing line.
Start by inflating your balloons (I recommend using a pump to save your breath), then thread them onto your tape in a random color pattern. The key to a professional-looking balloon arrangement is mixing sizes—think large, medium, and small clusters.
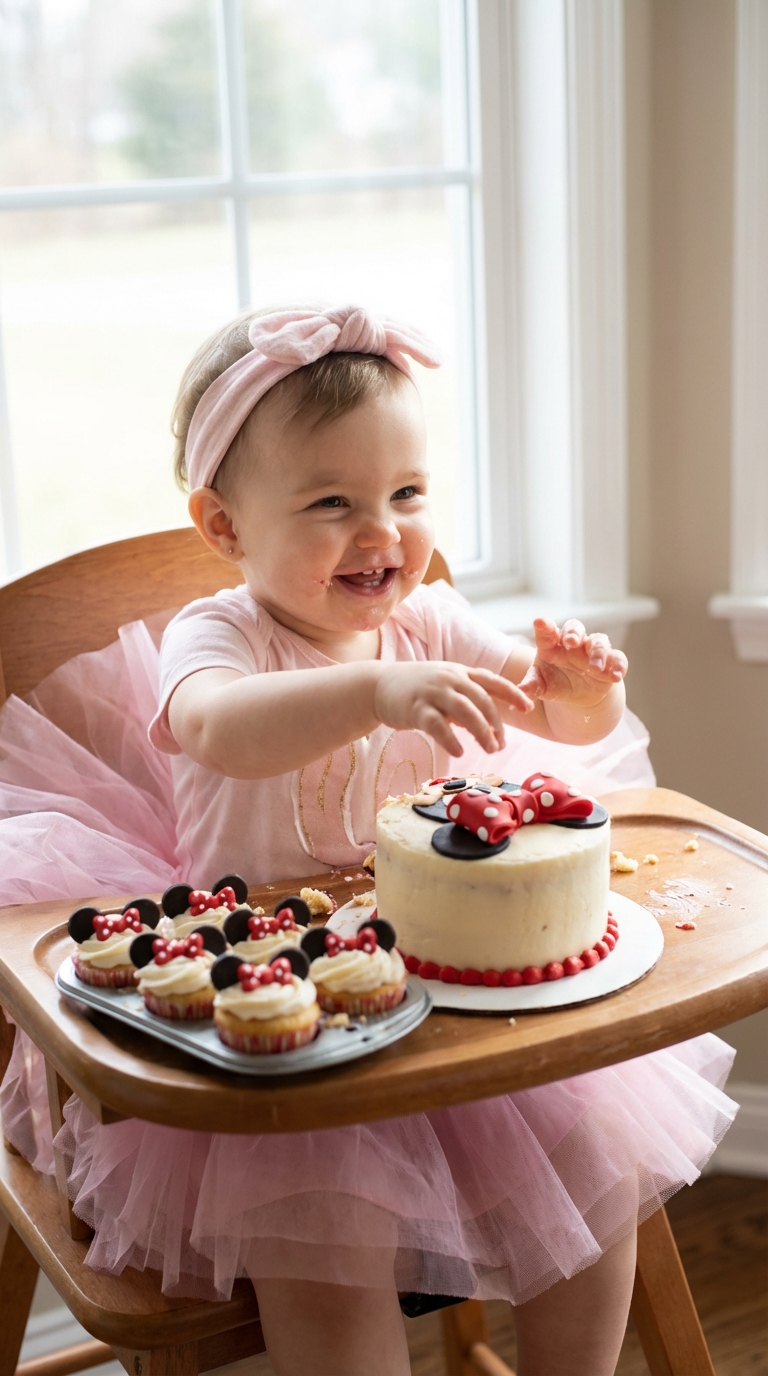
Add decorative touches like polka dot balloons or even small Minnie ears attached directly to certain balloons for extra charm. Consider pairing your balloon display with a matching Minnie Mouse cake as the perfect centerpiece to complete your party’s cohesive theme.
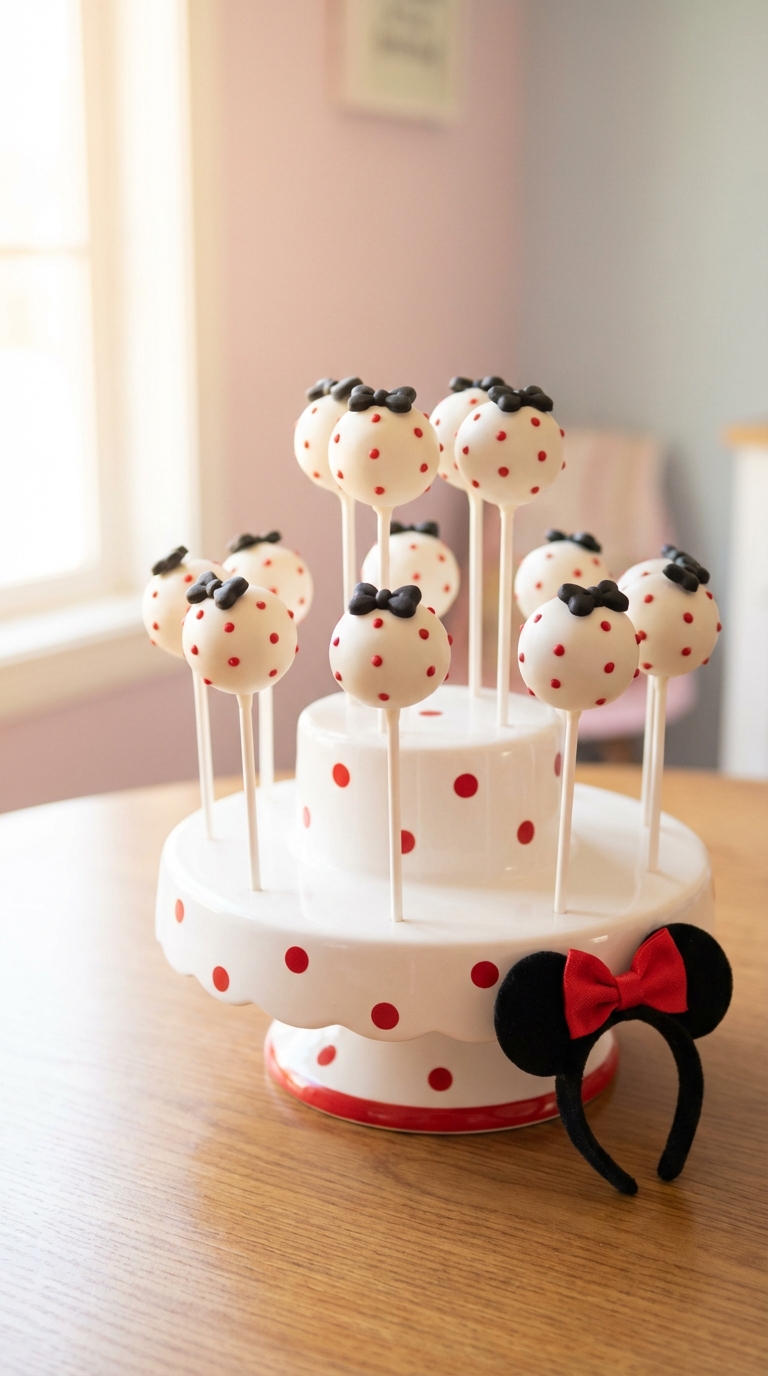
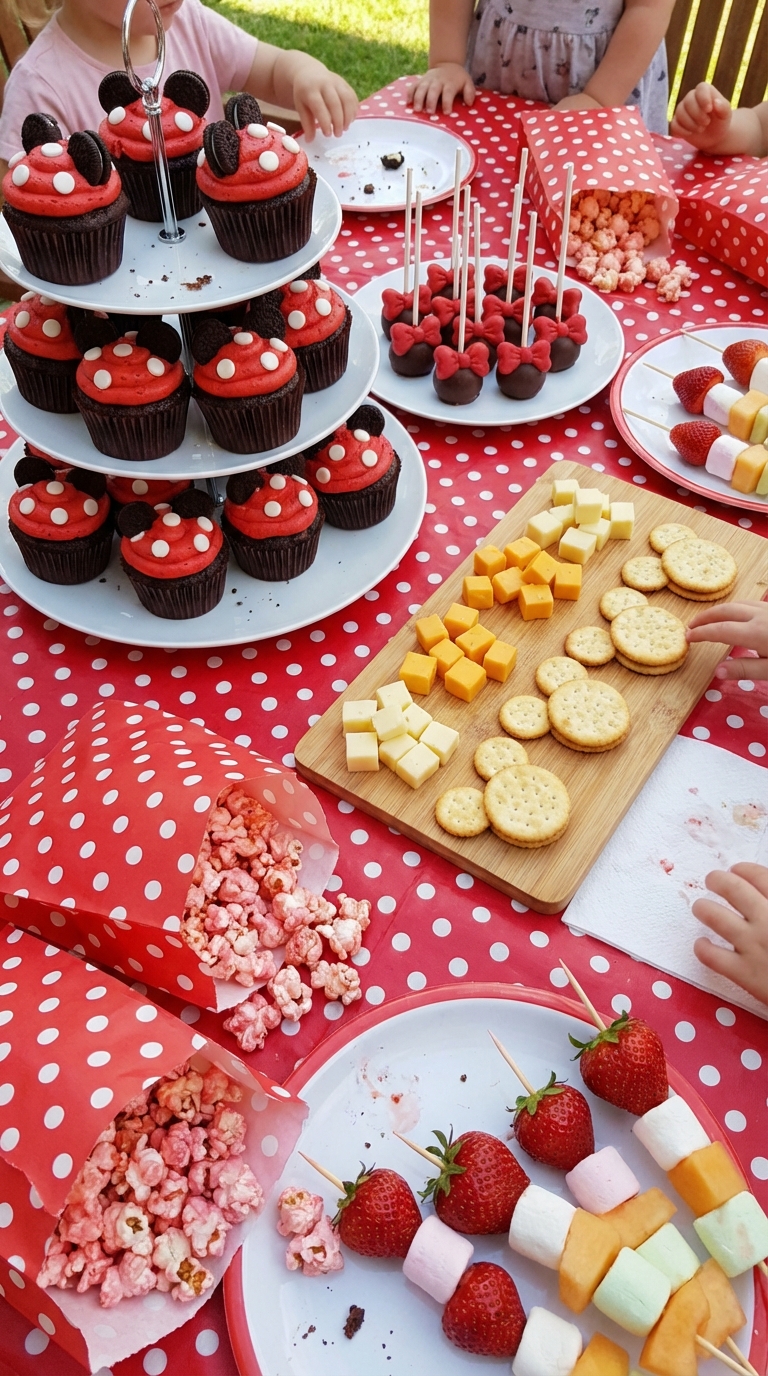
Handmade Minnie Mouse Cupcake Toppers and Wrappers
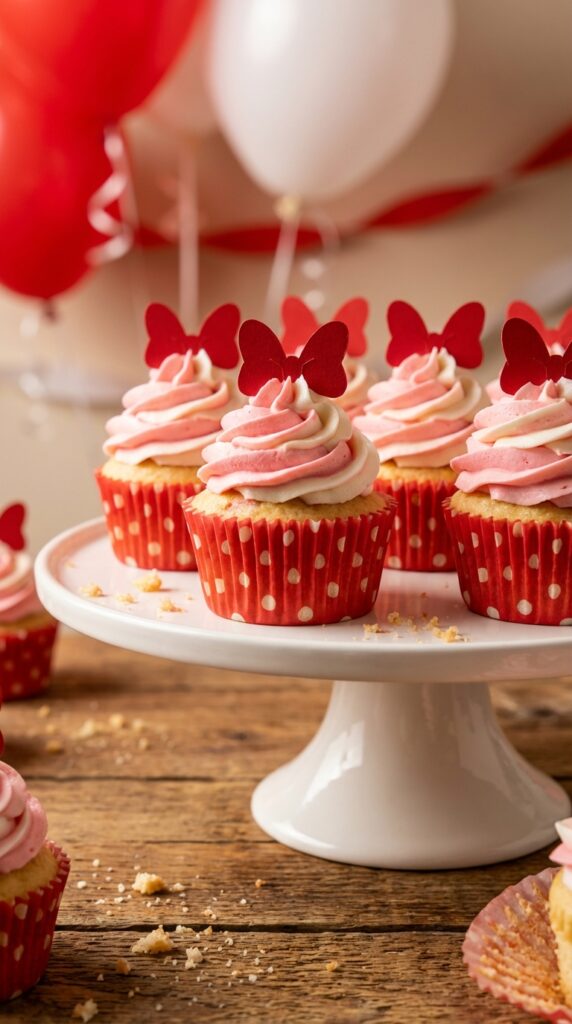
Cupcakes become instant party showstoppers once you dress them up with custom Minnie Mouse toppers and wrappers—and making your own is much easier than you’d think. You’ll need cardstock, scissors, and glue sticks to create personalized cupcake toppers featuring Minnie’s iconic bow and polka dots. Print free templates online or design your own using simple shapes.
For wrappers, cut red or pink cardstock into strips, then wrap them around your cupcakes before securing with tape. These cupcake decoration techniques convert plain treats into themed creations without requiring professional skills. I’ve made dozens using this method, and guests always assume they’re store-bought. Complete your dessert table with other Minnie Mouse-themed snacks that match your handmade cupcakes perfectly.
Create a Minnie Mouse Party Banner With Free Printables

A colorful party banner alters any blank wall into an Instagram-worthy backdrop, and you don’t need to spend a fortune at the party store to make it happen.
I’ve created countless custom Minnie Mouse banners using free printable template designs available online. Simply download your chosen design, print it on cardstock (trust me, regular paper won’t hold up), and cut out each pennant flag. Punch holes in the top corners and thread ribbon through them.
The best part? You can personalize it with your child’s name and age. It takes about thirty minutes total, and guests always assume you paid big money for it. These creative banner designs work especially well for three-year-old fans who get excited seeing their favorite character displayed prominently at their special celebration.
DIY Minnie Mouse Favor Boxes Using Simple Templates
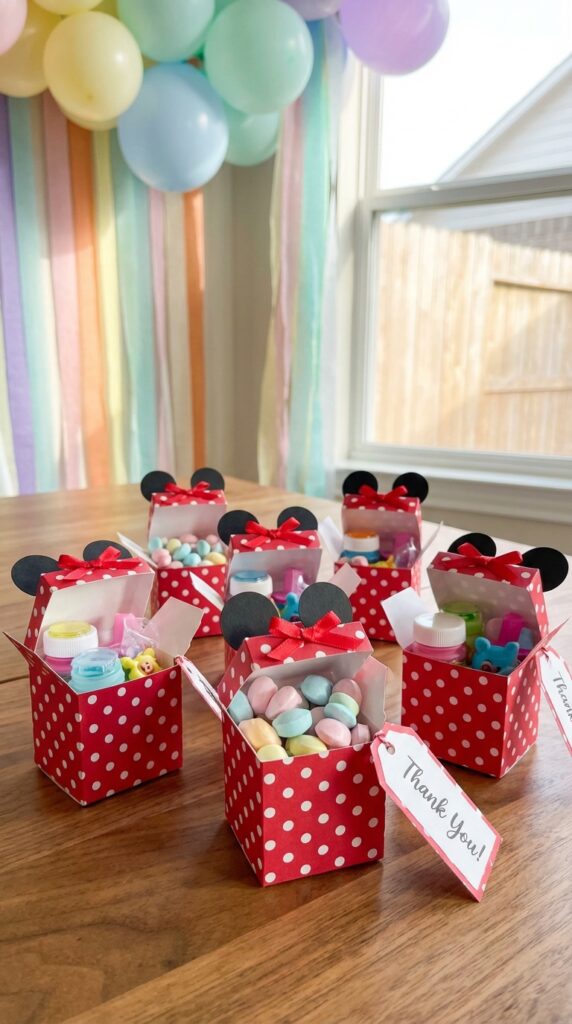
I’ll never forget the moment my daughter’s eyes lit up when she saw each guest leave with their own custom Minnie Mouse favor box—it cost me less than a dollar per box to make.
You can find free custom box templates online that fold into adorable mini gift boxes. I printed mine on red cardstock, then added polka dot ribbon and a small bow on top. The personalized favor boxes took about 15 minutes each to assemble while watching TV.
Fill them with small treats like stickers, mini crayons, or chocolate coins. These DIY favor boxes work especially well for a baby’s first birthday since they create such sweet and memorable keepsakes for this major milestone. Your guests will think you spent a fortune at a specialty shop.
Make Polka Dot Table Confetti From Card Stock Punches
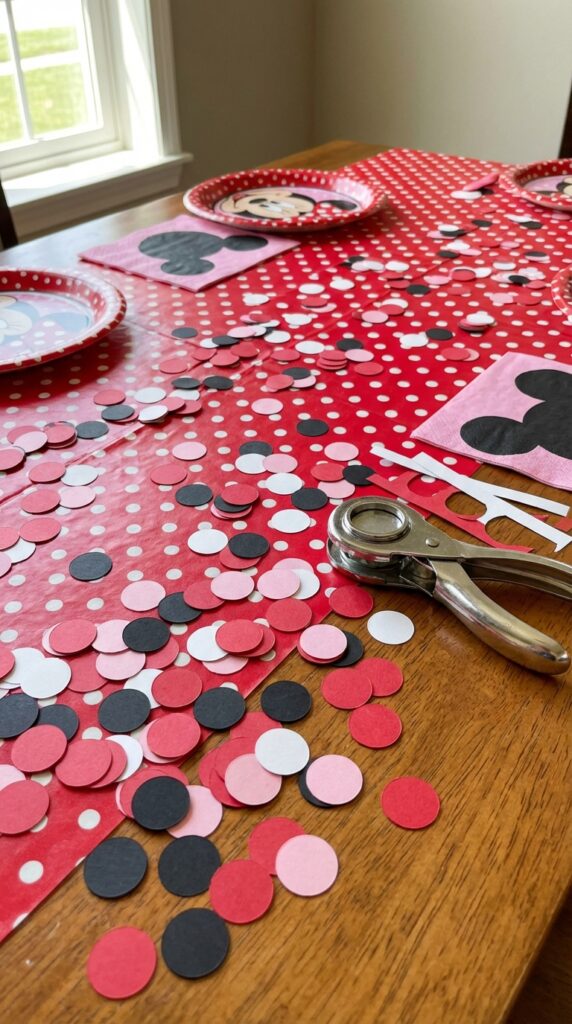
When I uncovered that a simple circle punch could metamorphose ordinary cardstock into hundreds of confetti pieces in minutes, my party decorating game changed forever.
You’ll want various punch sizes—I use 1-inch, ¾-inch, and ½-inch circles for visual interest. These confetti creation techniques work brilliantly with Minnie’s classic red, pink, black, and white palette. Grab unique card stock designs featuring polka dots or glitter finishes for extra pizzazz.
Pro tip: punch over a large bowl to catch everything immediately. You’ll create enough confetti for multiple tables in under fifteen minutes, and kids absolutely love tossing handfuls during the celebration.
Create a Minnie Mouse Dessert Table Cake Stand Display
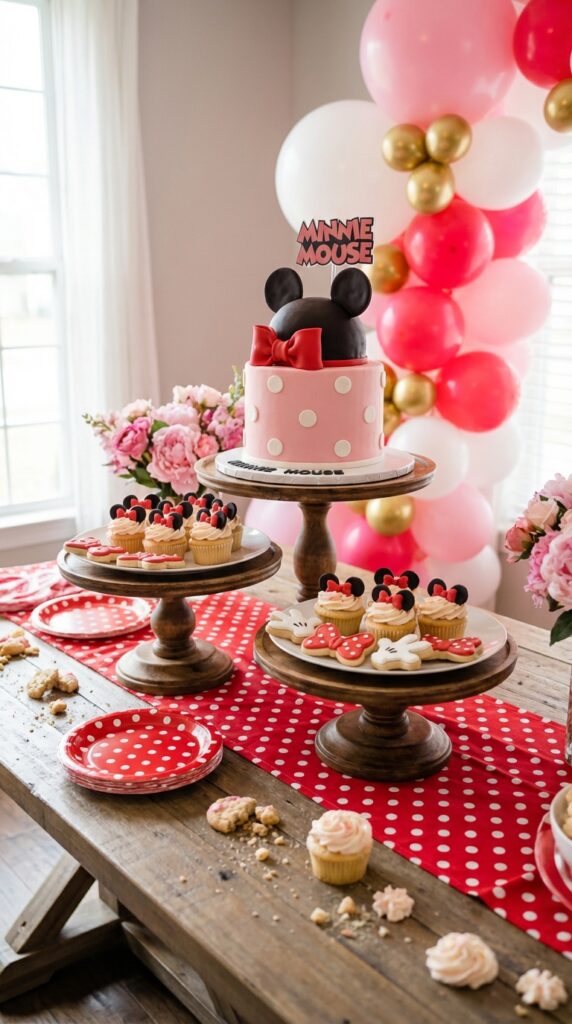
Three simple cake stands stacked at different heights will alter your dessert display from ordinary to Instagram-worthy. You’ll create visual interest by arranging tiered cake stands in a triangular formation—place your main cake on the tallest stand in back, with cupcakes and treats on shorter risers up front.
I’ve found that using a dessert riser display with polka dot platters ties everything together perfectly. You can even wrap the stands’ bases with red ribbon or attach paper bows. The height variation makes it easier for kids to reach their favorite treats while creating those image-perfect party moments you’re after.
DIY Minnie Mouse Door Sign to Welcome Party Guests
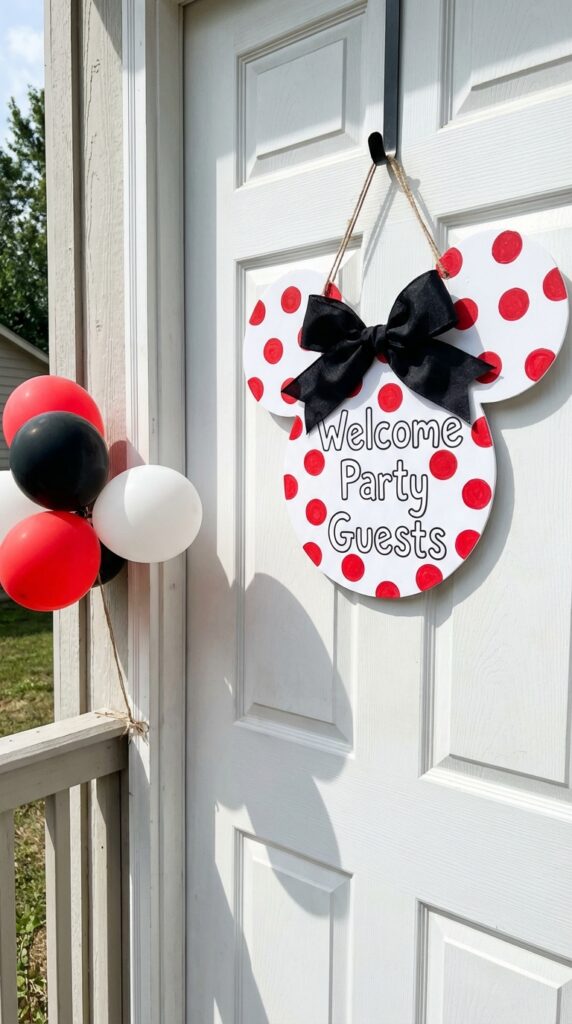
Before your guests even step inside, you’ll want to set the magical tone with a custom Minnie Mouse door sign that screams “party happening here!” I’ve made these signs using simple materials—a large piece of poster board or foam board as the base, red and white polka dot scrapbook paper, and a printable Minnie bow template.
Cut out your daughter’s name or add a personalized monogram in glittery letters. You can easily match your custom color scheme by swapping traditional red for pink, gold, or whatever works. Hang it with removable adhesive strips to avoid damaging your door.
Homemade Minnie Mouse Party Hats Using Construction Paper
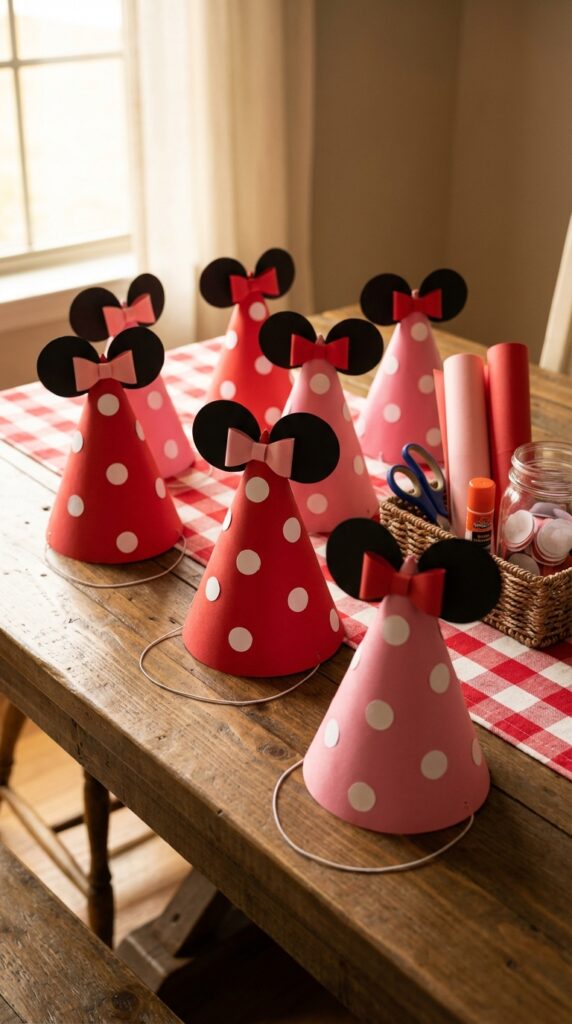
Once your door sign is welcoming guests, you’ll want to make sure each partygoer has their own adorable Minnie-inspired accessory to wear.
These construction paper party hats are surprisingly simple to create. I’ve made dozens, and they never fail to delight kids. Start with construction paper colors like red, pink, and black. Roll them into cone shapes, then secure with tape or glue.
The magic happens with decorative paper cutouts—think polka dots and Minnie’s signature bow. Attach them with adhesive, add elastic string, and you’re done. Each hat costs about fifty cents to make.
Create Minnie Mouse Place Cards for Party Seating
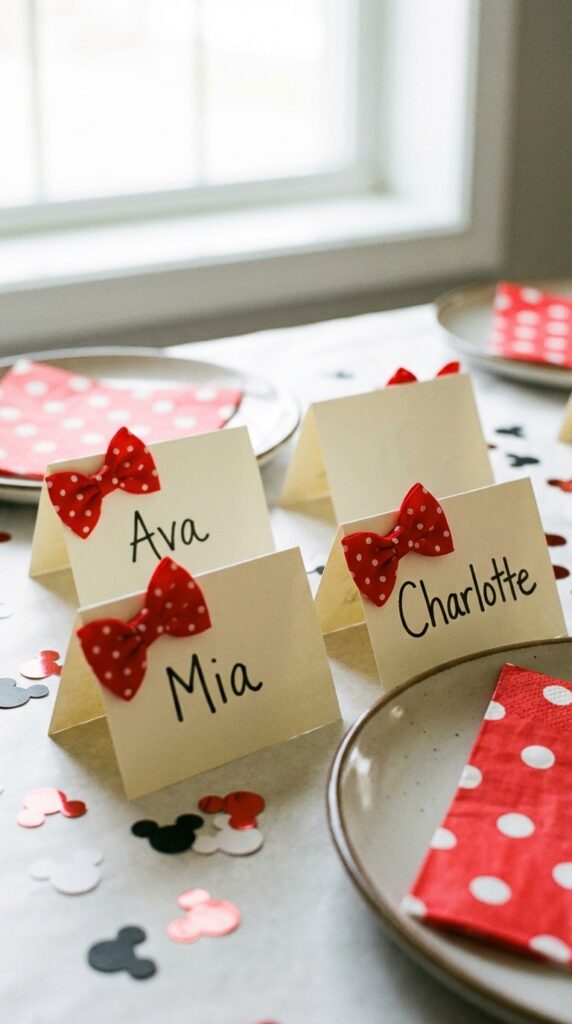
While your guests will love wearing their party hats, they’ll be just as charmed by personalized place cards at the party table.
Custom Minnie Mouse place cards are surprisingly simple to make. Cut card stock into 2×3-inch rectangles, then fold them in half. Draw Minnie’s iconic bow on top using red marker, adding white polka dots for that classic look. Write each guest’s name in bold letters across the front.
For enhanced personalized Minnie Mouse place settings, attach miniature bows using glue dots. You can also punch small holes and thread red ribbon through them. These charming details make kids feel special before they even sit down.
Frequently Asked Questions
What Age Range Is Most Appropriate for a Minnie Mouse Birthday Party?
You’ll find the typical Minnie Mouse party age ranges from 1-6 years old, with peak popularity around ages 2-4. When planning your party planning timeline, you’ll want to start preparations about 4-6 weeks before your child’s celebration.
How Far in Advance Should I Start Making DIY Decorations?
You should start making DIY decorations 3-4 weeks before the party. This planning timeline allows adequate time for materials procurement and completing projects without stress. You’ll have opportunities to remake anything that doesn’t turn out perfectly.
What Is a Reasonable Budget for a Minnie Mouse Themed Party?
You’ll need $200-500 for a reasonable Minnie Mouse party. Your party venue cost ranges from $50-200, while your food and catering budget should be $100-250, depending on guest count and whether you’re cooking or ordering catering.
How Many Guests Can These DIY Projects Accommodate?
Most DIY Minnie Mouse projects you’ll find can easily scale to any party size. You can adjust the guest capacity from intimate gatherings of 10-15 kids to larger celebrations with 30+ guests by simply making more quantities.
Where Can I Find Official Minnie Mouse Colors for Accurate Decorations?
You’ll find the official Minnie Mouse color palette on Disney’s style guides and licensing websites. Check Disney Store’s character merchandise availability for accurate color references, or examine licensed Minnie products at retailers for authentic pink, red, white, and black combinations.
Conclusion
You’ve got everything you need to throw a fantastic Minnie Mouse party without breaking the bank. These DIY projects aren’t just budget-friendly—they’ll make your celebration feel personal and special. Start with one or two simple crafts like the mason jar holders or headbands, then add more as time allows. Your little one’s face will light up when they see all the handmade touches you’ve created just for them.